Mustang II Diaries 2

Engine Work–Part I

When I first got the car, it had to warm up forever or it would stall. At stop lights, I had to be careful to feather the gas pedal to keep it from quitting on me. I enjoy an occasional adrenaline rush, but not at every intersection!
Anyway, our first order of business was to get the car running better. This would end up taking a while as we troubleshooted/fixed/replaced/fiddled with different parts of the engine over several months.
First, we ordered a rebuilt carburetor and my dad and I installed it. With the new carb, the car ran strong on straightaways with no hesitation but ran rough at slow speeds. After that, we did a tune up, replacing the spark plugs and wires, distributor cap and rotor.
Next, I drove the car to my brother’s place and he adjusted the fuel/air mixture, fiddled with the vacuum advance tubing, and reconnected the kickdown rod. The hesitation was 99 percent gone after all that. When I drove home I got stuck in bumper-to-bumper traffic and the car never stalled or overheated. Yay!
The last piece of the puzzle was the fuel pump, which was going bad. As soon as we replaced that (only $30), the car ran better than ever. Now I can drive it without worrying about being stranded (although I do have roadside assistance through my insurance so I can get a tow home if that happens).
Update: Even though the car is more reliable and runs smoothly now, the engine leaks oil, and could use a reseal. I’m hoping to get this done in September/October 2010 (more on this later).

Posted by Denice at 11:22 AM

Labels:

Mustang Muscle in the Mid 70′s Prt 3 1976

1976 I was a senior in high school, that was the year I had my first tasting of racing – not legal. My ’66 Impala against a Mustang ( a 1973 Mach I) and I got dusted, well almost, the knuckle head (he was a friend) stopped for a red light, I didn’t. My little 283, 2bbl engine (about 195 hp) was hauling about the same curb weight as the Mach I with its 351 CJ engine (about 266 hp) the outcome was certain. But traffic lights are the great equalizer!!!

But would it have had a different outcome if I was racing the new’s Mustang offering for 1976? Let’s see.

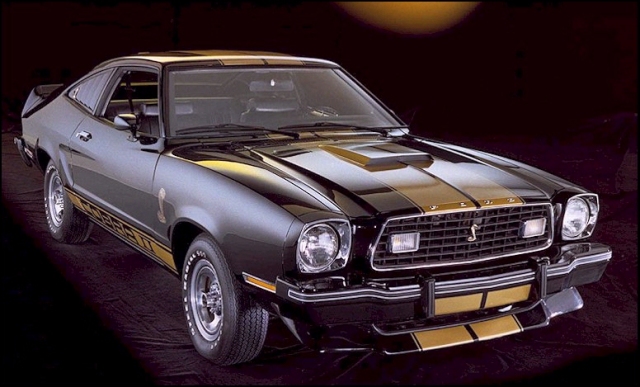
If looks were matched with speed, the 1976 Mustang would open of a can of whoop a$$ on my plain jane Impala. With the look of the Stallion Trim or the Cobra II you’d think they were carrying a no less than a V6 and hopefully a V8.

Cobra II

A spin on the original Hurtz rental Mustang.

Cobra II in Blue

Stallion Trim Package for 1976 (I’ve seen this paint job on a couple of Pintos too.)

But underneath  the Shelby type exterior or the Hurtz type color palate the cool exterior lay a 4 cylinder engine, nothing special.  But with Carrol Shelby’s endorsements and Farrah Fawcett driving one on TV the Cobra II (which was intended  to be limited to only 5,000 units) sold over 25k units.

But with the best engine you could shove under the hood, my 283 would’ve made pretty easy work of the 1976 Mustang.

Here are the engine specs that were available.

Vehicle Identification Numbers Engine Codes

140cid 2.3L 2V 4cyl 88hp Y

171cid 2.8L 2V V-6 105hp Z

302cid 5.0L 2V V-8 140hp


Thanks for reading.

Tim

Retrobuilt 2010 Mustang Turned Old-School Boss 302

by on June 13, 2012


This whole custom Retrobuilt seems to be all the rage lately from the Reversion Mustang at SEMA to the new GT500 CS convertible conversion. If you don’t know who Retrobuilt is, it’s a Official Licensee of Carroll Shelby Licensing, Inc. They specialize in S197 Mustangs from 2005-2011 and turn them into a modern classic by using custom fiberglass panels, true steel bumpers, door handles, rear window louvers, Shelby wheels, custom exhaust and retro tail covers. Every car built by Retrobuilt includes a serial number, dash plaque and Certificate of Authenticity.

However, another one just made an appearance on eBay motors in the form of a 2010 Mustang turned old school Boss 302. From the front it may seem to be an old school Boss 302, until you realize that the body is a bit different and then get a glance of that rear. Body panels added to this car go over the doors but replace the front hood and fenders. The rear deck lid panel is new and you can see that it also features the black hockey stick Boss stripes. The front and rear chrome bumpers are both from a 1969 Mustang. A good 58 lbs. have been lost and some of the weight has been transferred to the rear.

The interior features red leather seats and the same pattern is also on the door panels. The seats supposedly have no wear or tear and are in good condition, as well as the headliner and carpeting. Under the hood is the stock V8 complete with shaker hood with 34,973 miles logged on the odometer. This car is still under warranty until the end of September and the title obviously states that this is a 2010 Mustang.

What do you think of this retro Boss?  Drop me a note.

I, personally, like it, in an odd sort of way.  I’d have to see in it person.

Thanks for reading.

Tim

Agent 47 Harbinger 69-70 Mustang

Ok car and Mustang fans you are going to like this:

BOOM!

Agent 47 Harbinger Mustang for racing or street!!!

Isn’t that wicked looking?

They tried for the look of the 69 TransAm Mustang.

Shelby 1969 TransAm Mustang

The Harbinger is built for track or high performance street duty.  Here are some specs and more pics.  (Check out the racing video too.)

– Limited production of 250 serialized chassis

– Harbingers can be built using a brand new Dynacorn repro body or an existing 69 or 70 Mustang shell. {but it would have to be the fastback or sports back – not my ’70 Coupe  🙁  }

Race spec, low visual obstruction design, 12 point, chassis stiffening roll-cage of DOM steel.

Race proven SLA (double A-arm) Front suspension.

Ultra stable, Bill Osborne designed, V-link rear suspension.

Speedway Engineering 9” full floating rear axle.

Penske adjustable racing shocks with optional weight jacks at all four corners.

Ducted, low drag and lift hood, engineered and crafted by Agent 47.

Come ON!!! Tell me that’s not awesome!!!

Agent 47 designed vintage Recaro style racing seats.

Agent 47 designed, lightweight, Forgeline racing wheels.

Those are nice!!!

Brakes and master cylinders by AP racing.

Check out this set up.

16 lightweight components manufactured using the latest Rapid prototyping technology.

NVH controlled interior with strategic, lightweight, sound dampening materials.

A work of art. Very limited body roll with this set up. Much improved over the original ’69 TransAm

I’m not advertising for these guys, I just really like what they’ve done.  There are parts for Fox bodied and other Mustangs as well.

Here a long racing video (cameras are set up for you can see how the body reacts to cornering).

http://www.agentfortyseven.com/harbinger/index.html

Thanks for reading.

Tim

Car Show in – Rothrist, Switzerland

Remember a few post ago that covered MOPAR’s in Sweden? (Short Link:  http://wp.me/pKHNM-174)  I wrote how interesting it was to see US sheet metal in other countries.

Well check out this car show in Rothrist, Switzerland.  This is from Andres Palomares who lives in Bern, Switzerland.  There are some great examples of US car history in this show.

Switzerland is beautiful and visited Interlaken several times while living in Europe.

Thanks for reading.

Tim

Pics Vette and Mustang

Sometimes you just can’t pass up a pic.  This one was from

Rudy Morganti over on Corvette Pals
Being a Mustang and Vette owner..this one I appreciate

Own Two Muscle Cars? Tell me about them.


Own Two Muscle Cars? Tell me about them.

Tim

Hurst Competition Plus Shift Kit – Installation of Backup Light Switch – Pt2

So I’ve gotten the new electrical connection installed on the  switch.  I now need to cut off the old switch and strip the wires.

Ya know it’s hard to take a video while you a squeezed under a car on jack-stands!!!

In this video you can see the striped wires.

Installing the bracket was easy enough except that it wasn’t formed properly and had to be bent.  Keep in mind this is not ‘harden’ steel and too much bending will weaken it and when the reverse lever comes back will just push the bracket backward and not allow the button to be depressed enough to make contact and complete the circuit and turn the backup lights on.

Here it is all installed.

Here it is with the car in the reverse position. You can see the button depressed.

Here is a video shot.

And the intended results:

Now I’d love to tell you that all was well, however remember the bolt and the Sharpie mark I made on it so that I could gauge how far to screw it back in?

Well I was still pretty happy with the progress and I took the car off the jack-stand and started her up and backed out of the garage.  That went well, but there didn’t seem to be a first gear once I decided to pull the car forward, nor second gear.  She isn’t going to move.

So I’ve got the car out of the garage and right at the edge of the drive on the driver’s side. I have to get under the car and tighten that bold a few more turns.  I end up laying partially on the drive way, partially on the rocks (we don’t have grass in your yards here..we have small, gather in you pants when you are laying on them, sharp rocks) and partially on one of your shrubs.  Ok, lets not forget the glowing hot Hooker header pipes..yeah…just back out of the garage…no worries the hair on my arm will grow back.  Any way,  I tighten it just enough to get the car to go into second gear and pull it back into garage.

It had to go back up on the jack-stands for more adjustments, and I had to the switch off once to make adjustments to the bracket.  But success was achieved!!!!!

How I measure success!!!

Thanks for reading,

.im


Hurst Competition Plus Shift Kit – Installation of Backup Light Switch -pt1

A quick recap, I had a 1967 Ford Mustang Shelby manual 4 speed transmission rebuilt and installed it in my 1970 coupe. This included a Hurst Competition Plus Shift Kit. Of course the configuration isn’t even close to the original 3 speed and the old bracket for the reverse light switch won’t go back on.

I didn’t really think of this as the time of the installation so I just zip-tied the wiring and old switch up until I picked up the conversion part for the Hurst kit. This included a reverse light switch and a properly formed bracket. Cost was about $29.00 at the same local hot rod shop I bought the shift kit from – they are car guys not salesmen, which is why they didn’t mention the light switch bracket.

Don’t asks me why I felt the need to take video of the kit still in the package but here it is:

As you can see in the video below.  The switch had two screws as posts for the wiring, new switch..old school technology.   Basically you’d wrap the end of a wire around the screw and tighten, not a great connection for hanging under a car, nor for the amount of vibration the 302 dishes out.  Used the screws and the small ‘lock” washer to hold the electrical connectors in place.  That will last.


I’ll up this piece tomorrow.

Thanks for reading.

Tim


Ford Releases First 2013 California Edition Mustang Pictures


I really like this car.  These use to carry the moniker – California Special.

Posted by on January 16, 2012

Ford released three pictures of the 2013 California Edition Mustang, which has traditionally been an appearance only package. They have not released an exact part list yet but the pictures speak wonders for what you will get, including the popular glass roof.

You can check out more 2013 Mustang pictures over in our photo gallery.