This is another from YouTube.
As watchmaker in a past career I can really appreciated the skills it takes to make this engine. Having it run when it’s completed is priceless.
Thanks for reading.
Tim

This is another from YouTube.
As watchmaker in a past career I can really appreciated the skills it takes to make this engine. Having it run when it’s completed is priceless.
Thanks for reading.
Tim

Posted: July 29, 2012 in Uncategorized
I decided the time had come to get the front clip taken off the Wagon. I wanted to get the front frame cleaned up, and do the front end by the end of summer. I am shocked at how few bolts actually hold the whole front clip onto the ’58. 11 bolts, disconnect some wiring, and you can lift the whole front Clip (Dog house) off in one piece. It’s taken me longer to change the oil on a car than to remove the front clip on this car!
First I had to remove the front bumper with brackets attached. That was fine, except for the one chrome bumper bolt on each end of the bumper. They fought back pretty good. I had to sawzall them off.
I was without any help to lift the front clip off, so I had to tilt the front forward onto some large Foam cushions I had saved out of an old travel trailer I had gotten rid of years ago. They are a perfect for laying under vehicles to work on, and for cushioning large loads like this.
Next I will be removing the wiring from the front clip and saving it for future use. This front clip needs work. The front fender bottoms are rusty, and the hood is so badly rusted it is of no use. So either I will sell this old clip to someone who has nothing, or dismantle it, save parts and scrap it.

 My first major project was the trunk area. The weatherstripping as you can see from the picture (left) was dry rotted and peeling and I didn’t like how the backs of the tailights were exposed. I found out that standard coupes didn’t come with anything but a simple gray trunk carpet and a round piece of wood covering the spare tire. I wanted a cleaner look, so I purchased a plastic panel that came out of a 1978 Ghia to cover the taillight assemblies.
I recently ran across this guy’s company on the web. Some very nice powder coating

The grill was done on this 50’s truck

Nice job on these bike parts.
T-Bird Specialty Power Coating http://www.tbird53119.com
I’m seem to be on a Mustang kick lately. Here is great video on upgrading the brakes on your late (relatively) Mustang.
Good luck. Chase down the notes on MotorZ site. http://www.motorz.tv/
Thanks for reading.
Tim

These guys work on some newer ‘Stangs. But there are some good hints and tips for working on your Mustang.
They have given permission for me to share the videos on Average Guy’s Car Restoration, Mods and Racing.
Thanks for reading.
Tim
Ford Find: Fan finds uncle’s long-lost ’46 hiding in barn.
From http://www.oldcarsweekly.com

Richard Cleer stumbled onto the 1946 Ford coupe his uncle built in the 1950s while searching for a flathead engine. He had to trade this tractor to bring the Ford back in the family.
By Angelo Van Bogart
Richard Cleer of Ipava, Ill., considers himself a Ford man and an International Harvester man, and he probably never thought he would have to betray his allegiance for one to get the other. However, that was the price Cleer had to pay when he retrieved a family heirloom earlier this year.
When Cleer found the 1946 Ford five-passenger coupe his uncle had hot-rodded in the 1950s just 25 miles from his home, he was actually following a lead to a 1939 flathead engine for another car.
“A guy said he had a 1939 Mercury flathead in the weeds,” said Cleer. “The engine in the weeds wasn’t right, so he said, ‘Maybe I have one in the barn.’”
The barn Cleer was taken to last fall was so overgrown with vines, trees and tall grass, it would have taken Indiana Jones to find it. When the owner cracked open the weathered red barn doors, Cleer saw the unmistakable shape of 1940s American iron.

Had he not been led to this overgrown barn, Cleer had little hope of ever stumbling onto the Ford his uncle built. Note the postwar Chrysler lurking in the barn; it was parked in front of the Ford.
“When he opened it up, I said, ‘That looks like my uncle’s old 1946 Ford,’” Cleer said. But he was mistaken. The car at the front of the barn was a 1946-’48 Chrysler. His uncle’s 1946 Ford was actually parked behind the Chrysler.
Cleer asked where the seller had bought the Ford coupe, and the man repeated the name of Cleer’s uncle. It had been parked since the early 1960s, not long after Cleer’s uncle sold it to the man. Cleer was able to further verify it was his uncle’s car, because all of the tell-tale modifications he remembered from his uncle’s Ford were still present. Blue paint still covered the Ford’s body, the push buttons were still in place to open the doors and the hood and deck lid had been de-chromed just the way Cleer remembered his uncle’s car.
Since the doors opened electrically and the long-parked Ford’s battery was dead, Cleer couldn’t determine whether the knob his uncle installed to open the deck lid from behind the seat was still there. Undeterred, he crawled in the side windows for a better look inside. Sure enough, that old knob was right where it should have been.
Despite Cleer’s excitement, he was told the Ford wasn’t for sale. Two months later, Cleer had worn down the Ford’s owner, although the Ford still wasn’t exactly for sale.
“He said, ‘If you want that car, you have to trade me for a John Deere tractor,’” Cleer said. “Well, I’m an International-Harvester man — I worked for International Harvester.”
Despite his allegiance, Cleer began searching for a John Deere tractor of the same value as the Ford, and one that would also satisfy the seller, to complete the trade.
“It took until May or June to find a tractor, because I didn’t want to get one he didn’t want and be stuck with it,” Cleer said.
Eventually, a John Deere was located at a dealership in Missouri, so Cleer called the Ford’s owner and asked him to call the dealership to make sure the tractor met his approval.
“He had the dealer run it for a half-hour, and he said it would be fine,” Cleer said.
After Cleer purchased the John Deere, the next challenge was retrieving the Ford from its approximately 50 years of storage. Although the brakes weren’t stuck, the Ford had been parked on a sandy floor, which helped preserve the sheet metal, but also caused the car to sink into the ground.
“It took four people five hours to get it loaded on the trailer,” Cleer said. “It had two flat tires, so we loaded it with used tires.”

After five hours of work, Cleer was finally able to retrieve the Ford from hiding. It was in remarkably good condition and exactly how his uncle had built it.
Once it was in the daylight, he finally had a good idea whether all of his efforts had been worthwhile.
“When I looked at it the first time, I didn’t have a flashlight and I didn’t know what it looked like,” he said. “It’s in really good shape — it’s really unbelievable. There’s just a little rust in the driver’s floor.
“It still has the same paint, and the interior my aunt put in it,” he added. “It looks like the seats and door panels are drape material.”
The Ford is still powered by the 1950 Mercury flathead with a 4-inch stroke that Cleer’s uncle installed with high-compression Edelbrock heads and dual 94 carburetors on an Edmunds intake. Cleer has already begun rebuilding the setup to make the Ford roadworthy again.
“I’m going to leave it that way,” Cleer said. “I had to pull the heads because it wouldn’t turn. I do all my own engine work but the machine work, and the machinist said [the engine] is in pretty good shape and the heads have never been ground.”
“It’s a good hot rod,” Cleer said, and one worth temporarily forsaking one tractor allegiance for another, even if the John Deere had the last jab.
“We had to use the tractor I traded to pull the cars out of the barn, and after we got the car loaded, I had to load the tractor and deliver it to his farm.”
Posted: February 1, 2012 in Uncategorized
Tags: 1958 ford power brake, 1958 Ford Swift Sure Brake Assembly, Ford Swift Sure
I cleaned and painted the rear booster bracket. After rebuilding the booster, I have decided to bolt the booster to the Brake pedal assembly. It fit just as it should, and can now box, and store this assembly. One more part of the restoration done! 7,329 more to go!
Reunited, and it feels so good….
Are you ready for this???? New project. Code name: The Bridgestone Project.
1965 Bridgestone Dual Twin.
Take a look:
Let’s get ready for some specs!!

The Bridgestone Project..your mission should you decide to accept to restore this mess!!
Thanks for reading.
Tim


Posted: May 13, 2012 in Uncategorized
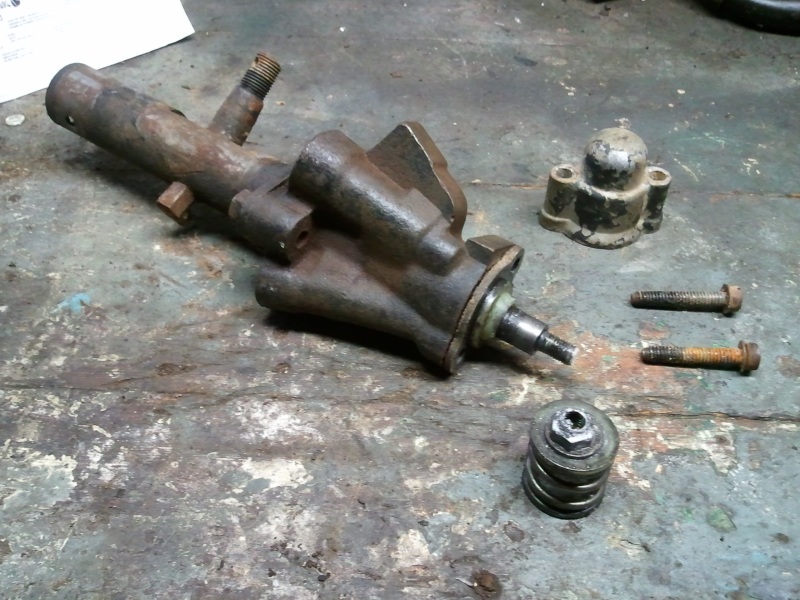
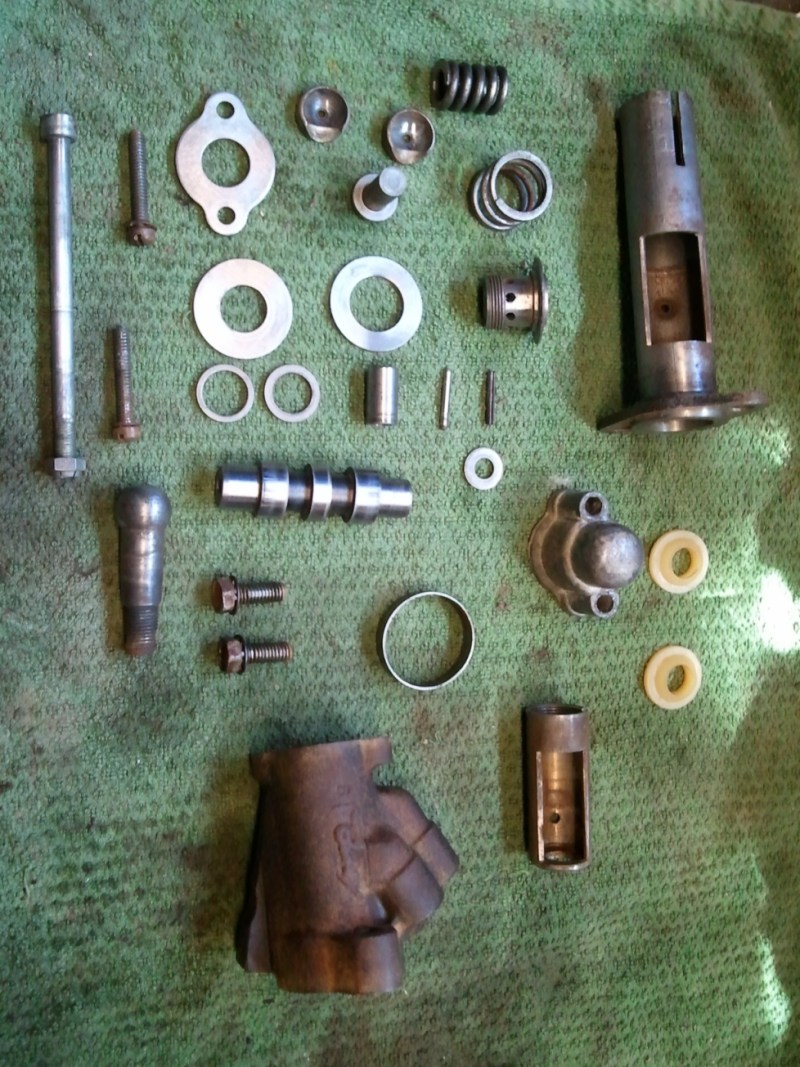
So I spent Friday night dismantling the control valve, in order to soak it all overnight for a Saturday morning rebuild. It all came apart relatively easy. After having it all soak all night in some super clean, I cleaned it all up an then soaked all the internals and housing in some power steering fluid. I rebuilt the valve with a rebuild kit and a new ball stud kit as well. Then I coated the spool valve spring and nut with some white lithium grease and installed the end cap.
I then painted it in some chassis black semi-gloss and installed the stud boot and retainer. All done!


Thanks for reading.
Tim