Take a look at the Stang at #BarrettJackson…wait for the special appearance of SR73 at the end.
Enjoy!
Tim

Take a look at the Stang at #BarrettJackson…wait for the special appearance of SR73 at the end.
Enjoy!
Tim

Welcome back to Project Sports Roof (#ProjectSportsRoof). The struggle is real!!!
You saw in the last video my replacement of the linkage that was lost by the repair shop (along with my new battery and started). This repair shone the light (as often happens with older cars) on a previous repair. Some might call it a hack and I get it, there are times when you need to take short cuts, but as usual short cuts often have short life spans.
Take a look at the video:
When you have issues with shifting an automatic transmission and it’s related to the linkage you have the option of fixing it right or fixing it “wrong” (i.e., short cut). At some point in my Mustangs earlier life the C4 transmission was swapped our for a used C6. It seems that the C6 (from a 1972 Ford – which really doesn’t matter the C6 has changed much in all this time) had a broken shift lever. Take a look:

Here the run down:
A is the broken shift lever. What you should see there is something like this:

B is what is commonly called a ratcheting shift lever. It’s a replacement that is ‘clamped’ on to the stub of the shift lever to shift the trans. This is done because to replace the unit you have to drain the transmission, remove the pan, the filter and the valve. This is a PITA. Especially true, if you just put the transmission in and filled it with fluid!!!) So the after market ratcheting shift lever is common. This what the parts looked like when I took them off:

Custom hack
Of course C is a washer and D….well, D is a very special customization or it’s just a hose clamp.
As you can see at the end of the video the ratcheting shift lever was just sliding. I suppose I could have just tightened clamp down and see if it shifted, but how reliable would it be…might as well fix it right!!!
Thanks for checking on #ProjectSportRoof.
I have more coming up on my 1973 Stang and more on Bill’s ProjectBeepBeep as well.
Tim

Anytime you need work on the suspension on anything under a Mustang you have to lift it in the air, whether on a floor jack or a lift. But what you might not have ever heard is that raising a 1965-1973 Mustang on a regular two-post lift without a support between the upper control arm and the frame rail will damage the shocks and strut rods. There’s no telling how many times over the last 50-odd years of lifting a Mustang for a simple oil change that possibly has broken shock and strut rod bushings. The numbers must be in the millions.
Ford supplied dealers with a factory service tool, which they also used on the assembly line, to support the front suspension. Without this support, lifting the car drops the front suspension down and places all that weight on the front shocks and strut rod bushings. This damage is much more than cosmetic. The car will now be unstable at speed, more or less depending on the severity of the damage. Maybe one gentle lift will not result in visible damage, but with multiple unsupported lifts, the damage gets worse.
Bob Perkins of Perkins Restoration (www.perkinsrestoration.com) showed us how to avoid busting out shock tower and strut rod bushings when raising a Mustang on a conventional, two-post lift—or any lift with side arms.
 01. This 1973 Mustang front suspension drops and “hangs free” when raised on a two-post lift. This lift picks up the car with arms at the side for access to the undercarriage.

 02. Most of these Ford suspension support tools from the 1960s and 1970s have disappeared. Ford shop manuals instructed mechanics to place this support between the upper arm and the frame side rail. Notice the notch on one end. This original suspension support tool has a Ford part number.
 03. Because original support tools are scarce, Bob Perkins has fabricated his own for everyday use. On the left are two supports he made. On the right is an original Ford support tool from the 1960s.
 04. This illustration from Ford’s 1965 Mustang shop manual shows where to place the support tool when lifting a Mustang on a lift with side arms. The shock is inside the coil spring on top of the upper control arm.
 05. The Perkins-built suspension tool, as seen on this 1973 model, fits between the frame rail (bottom) and the upper control arm under the ball joint. To install, first lift the car enough for the tool to fit.
 06. Bob Perkins shows us damage to this shock on a car that was lifted without a support tool. The suspension dropped down and tore the rubber bushings in the top of this original shock.
 07. Installing a support tool also protects strut rod bushings from damage.
 08. On 1965-1970 Mustangs, the shock bushing at the top is apt to break when the suspension falls without support.
 09. Likewise, the shock bushings in the 1971-1973 shock tower will have to absorb the weight of the front suspension if the support tool is not used.
Juneau, WI 53039
920-696-3788
www.perkinsrestorati…

We interrupt this Heater Box restoration for an important announcement.
THE 351 CLEVELAND IS BACK!!!
 |
 |
 |
 |
The main piece of this project if finally complete.
Here’s what we have now:
351C bored .040
Crank .020 and Stock cam
Flattop pistons
Double Roller Timing Chain
Here’s what I’m going to add:
Edelbrock 4bbl CARB 800 CFM ELEC CHOKE
Edelbrock Performer 2750 Intake Manifold
Heads have been restored and upgrade as follows:
Bronze valve guide, stainless 1 piece valves, MATCHING retainers, a proper 3 angle valve job,
springs matched to cam and set up to proper height and pressure checked and hardened seats.
Here a more complete look:
Keep checking back as I have to finish the heater box, engine bay and the top half of the 351C. Lots of fun coming up!!!
Thanks for reading.
Tim

Average Guy’s Car Restorations, Mods, and Racing
73 Mustang 351C is Out – YouTube
Great American Muscle Cars – muscle cars – Community – Google+
Welcome back to #ProjectSportsRoof. Floor pan are ready to be welded into place on the 1973 Mustang Sportsroof.
Now I’m not a welder and there was no way I was going to experiment on the Mustang. So I enlisted the assistance of my neighbor Dan Thomas. Dan is quite the artist with his welding and metal work and although this build didn’t require much fancy design work…just quality welds and Dan delivered.
The goal here is to tack the fitted metal patch panels in place. The welds need to be strong and in the proper places. Now you might say, “Hey did you say that the Mustang is a unit-body and that the floor needed to be strong since that’s what holds the car together – mostly?” Yes that is true, however this Mustang will have frame connectors added to make this reasonable.
Just a note about the welding, you have to use gas with the mig…the metal for the patch panels are not that thick and the portions of the floor you are welding it to are old…so you need the added gas.
To start with I needed to strip the tack locations down to bare metal. You can see some of that in this image.

Here a little video clip of the work. Note: Don’t adjust your device’s volume….there is no sound on the first part of the video…well there was, but it was mostly me chewing gum…not very cool to listen too.
Here is some of Dan’s most excellent work.
 |
 |
 |
 |
 |
 |
 |
Thanks Dan!!! |
Thanks for following along with the project. Drop me any questions, comments and/or your thoughts!!!! Coming up next is the coating of the floor and the heat and sound barrier.
Tim

Stang at work!
1973 Mustang SportsRoof – Floor Pans Getting To It! – Part Four …
1973 Mustang – Project Sports Roof – Pertronix Ignitor Update
It’s pretty cool to happen upon a car show in the course of running weekend errands. I normally have a calendar event for the major shows and/or the ones I plan on attending. But now and then I see one in passing, and of course I am compelled to stop and usually do. Sometimes there are some real gems. By gens I mean cars you don’t see at the average car show as they may not be in top condition or even restored at all (that doesn’t stop me) and the owners would enter them.

You don’t need shiny paint to go to a car show. Here’s #ProjectSportsRoof at its first car show.
A couple of weeks ago I picked up my son at his place and we took care of some business. I always have my ‘old car’ radar on and it went off as we passed a little church. We had finished all of our tasks so I stopped. There may have been 15 cars in the parking lot with hoods up and doors open. True to form there were a few cars that one rarely sees at a car show.
This awesome Fox-body Mustang Vert was in the line-up:
 Fox-Body Vert w/ Whale Tail! |
 Oh MAN!! Look at that plumbing!!!! |
There was this 1964 Chrysler 300 K. You don’t see many of these at a show. Love that it’s a 2 door.
 ’64 Chrysler 300 K |
 Cool Steering Wheel!! |
Here is a rare sight!!! Mercury Comet Caliente VERT!!!!
 This Comet is in O.K.shape |
 This cars is nicely preserved and a little body work has been done, but still very nice car. |
But this next car was my favorite as unlikely as that may seem, I’d buy this car and I’d show it big time!!! Check out this 1974 Mustang II:

I think it’s a sharp little car!!!

Nice wheels!!!!

Yeah..that’s a V8 – 302!!

Still lots of room under that hood.

Interior is so awesome.
You can tell that this car was stripped and restored. It was painted with, even the interior, with a white rhino lining/satin like paint. It is just amazing and I’m was impressed.
Thanks for reading.
Tim
Check out these other post for Mustang II:
The Mustang II – Say What?
http://wp.me/pKHNM-uY
Mustang Muscle in the Mid 70’s
https://www.average-guys-car-restoration-mods-racing.com/mustang-muscle-in-the-mid-70s/
Feature Car – 1978 King Cobra
https://www.average-guys-car-restoration-mods-racing.com/feature-car-1978-king-cobra/
“The most wonderful time of the year!!!” No not Christmas – BETTER! It’s car show season!!! From March though Oct here in the southwest is prime car show season.
Normally I start feeding my car show appetite in January, during the car auction month that kicks off with Barrett Jackson in Phoenix, AZ. With my budget these are just fancy car shows, rather than a shopping trip. Then I suffer quietly until March when all the shows start kicking-in. This year I didn’t attend the Barrett Jackson event so I starved until this past weekend when I could attend my first show of the year. That show was Fords on 4th Ave, Tucson, Az.
I’ve attend this show for the past 4 or 5 years, even entering my 1970 Mustang one year. It is always a great time!
This year either with the 50th Anniversary of the Mustang, you’d expect to see a lot of the new cars and you would not have been disappointed. If you follow me on TWITTER (@AGCarRestore) you would have seen live shots. (You may want to follow me on Twitter, this weekend 3/13 I’ll be tweeting from the Good Guy’s show in Scottsdale, AZ.)
Here is a sampling:
 This is the 2015 GT. |
 Back end looks great!!! |
 2015 GT |
 Great looking Hood |
Check out this customized beauty.

Lambo Doors!!!

Hood slides forward

You have to appreciate the skill!!!
Here is a sampling:

Love the 2+2!!!

Nice looking art work on this GT!


More coming up!!!!
Tim
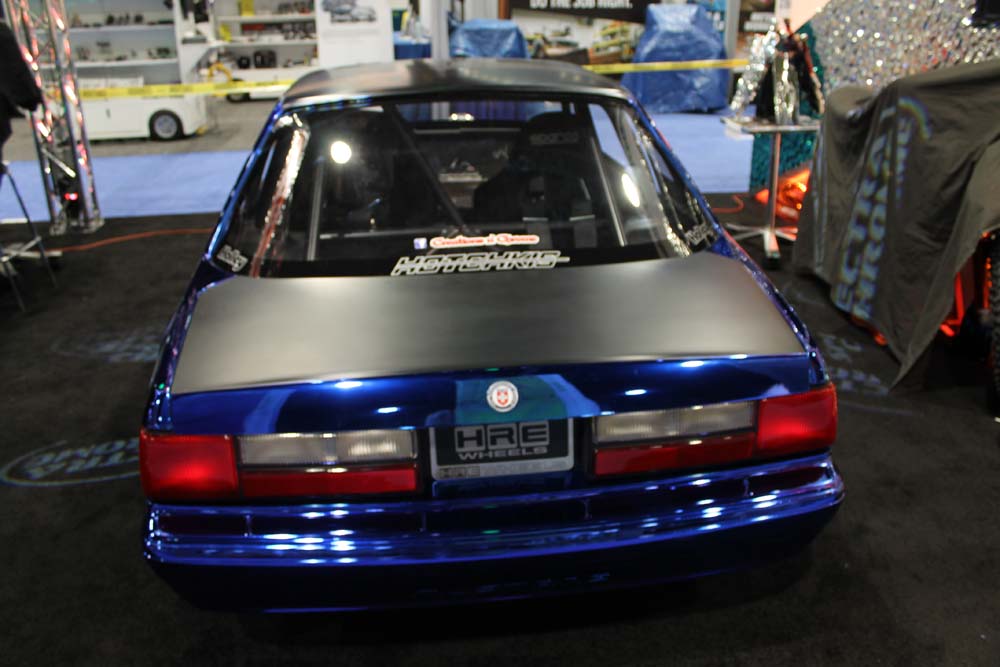
Chrome Fox Body is More Than a Pretty Face – MustangForums.com.

Marcus Slater
Mustang Forums
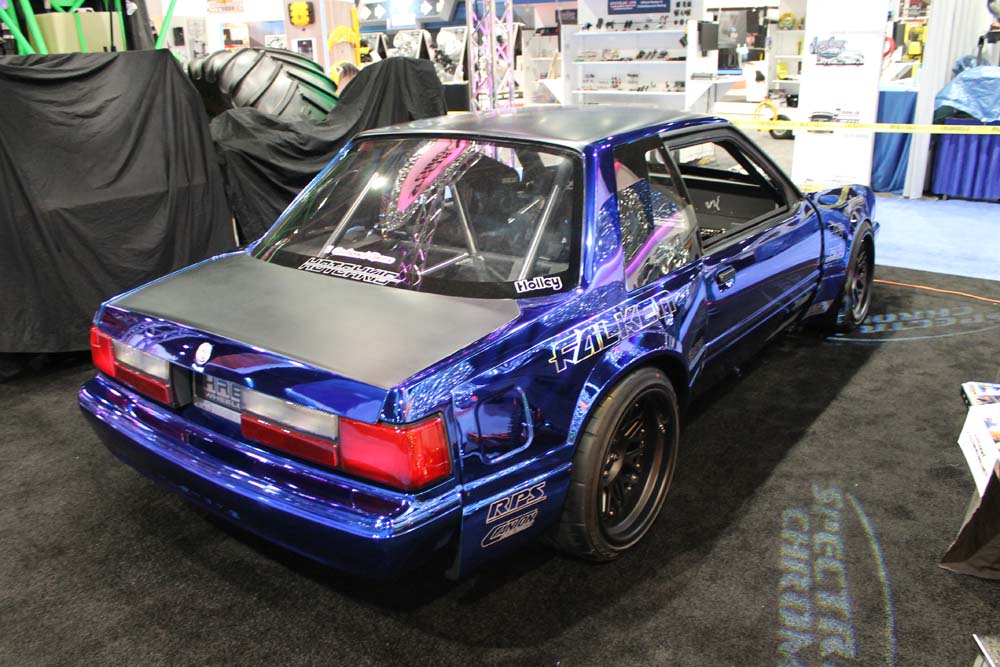
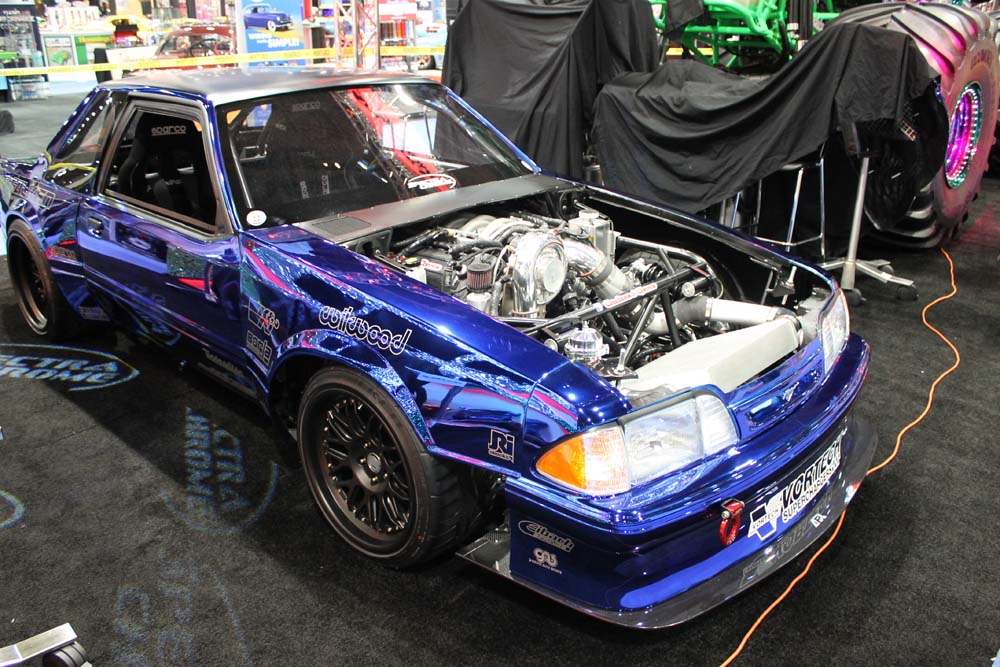
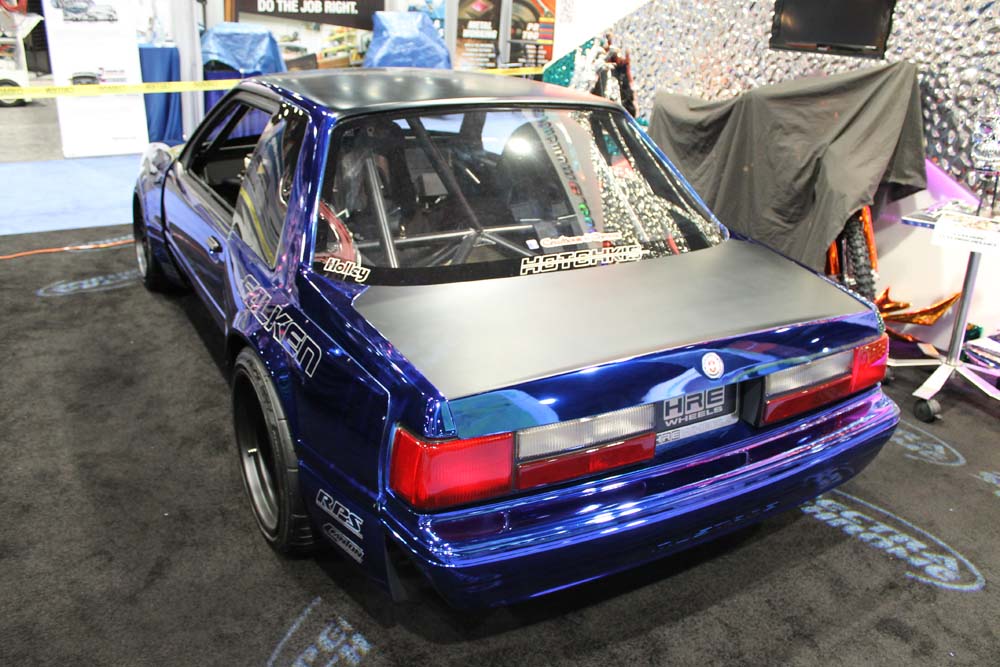
Most of the attention was on the newer Mustangs this year, but that doesn’t mean that the venerable fox body was overlooked completely. We saw this one customized by Creations in Chrome at SEMA right next to the grave digger monster truck![]() . And, from the look of that wide body kit and matching tires
. And, from the look of that wide body kit and matching tires![]() , we’d say that it fits right in.
, we’d say that it fits right in.
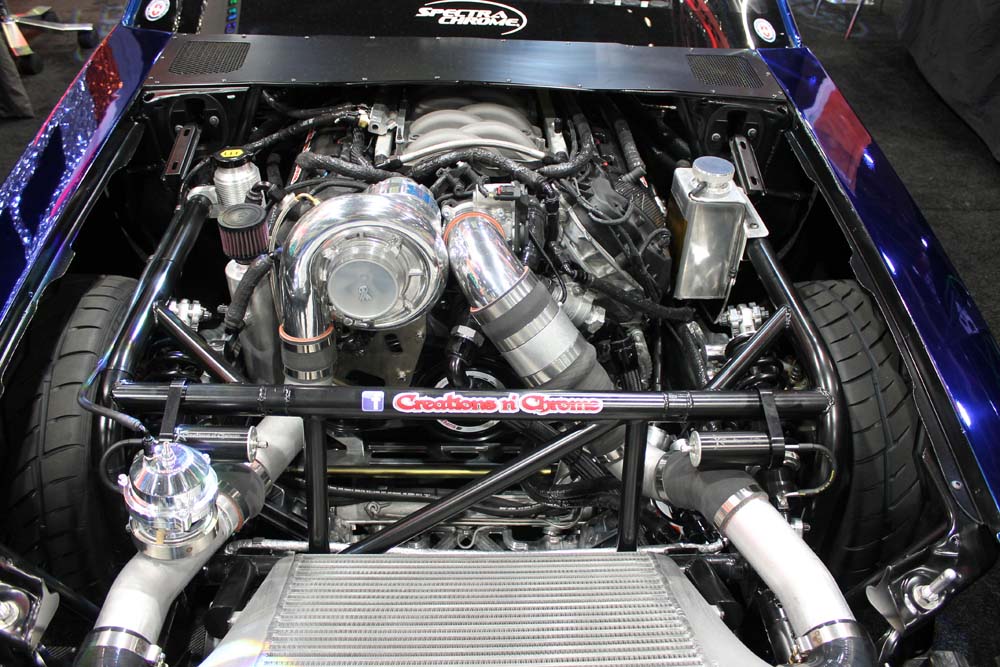
The thing about Creations in Chrome is that their name would lead you to believe that all they do is make things pretty. When in fact, their show cars![]() are genuinely built to race. A few months back they brought their 2011 Mustang Show car
are genuinely built to race. A few months back they brought their 2011 Mustang Show car![]() to the Mojave Mile and ran it at 182 mph. From the looks of it they’re not messing around with this fox body either. I mean check out the size of that intercooler! And the size of the supercharger
to the Mojave Mile and ran it at 182 mph. From the looks of it they’re not messing around with this fox body either. I mean check out the size of that intercooler! And the size of the supercharger![]() , geez.
, geez.
So yeah, you’d be forgiven for assuming this shiny Mustang is just another SEMA showcar. But in reality, everything about this thing screams race car. I’d be curious to see how it runs down the quarter mile. Hopefully Creations in Chrome will oblige us with video like they did last year.
 |
 |
 |
 |
 |
 |
I don’t have a 60’s vintage Mustang but I know some of the readers here do. This is a voice over slide show video, it’s done by a company that sells conversion kits for your 64-66 Mustangs. It’s a bit dry, but it’s pretty straight forward process.
Thanks for reading.
Tim
