MOPAR’s 318 Part II

Before I start this next segment on the 318, I have to admit that organizing and presenting this work of art (oh..yeah..I’m laughing too!!!!) could have gone in a lot of directions.   The two that stuck out the most for me was by year (chronologically) or by brand.  Neither was a solid idea and at some point in the ’70s the only thing separating brands within most U.S. car manufacturers wasn’t much more than vinyl vs cloth seat covering.  So I decided to go with brands, Chrysler, Dodge and Plymouth, knowing that there we would be some crossover information and it might look a bit disjointed.  There’s some good stuff, and a couple of things you might know about the 318.

Chrysler began using the 318 in 1967 and carried that power plant until the late 1990s.

From 1967 to 1971 the 318 carried a 230 hp rating w/ the standard 2 barrel carb, managed 340 ft lb of torque and sported 9.2:1 compression ratio.  (that is actually a lower compression ratio than the original Ford 250 straight six I took out of my Mustang).  In 1967 the 318 engine was used in the Belvedere, Satellite, Fury, Coronet, Polara and Charger and in 1968 they added as the base option in the Dart GTS and Barracuda.

1967 Polara 4 door.


From 1972 to 1979 the 318 was bounced around in the horsepower arena between 150 to 140.  That’s nearly 100 hps lost from the late 1960’s.  At lower end of the new scale were the California models with the extra smog control.   It was still a mainstay, being the base engine choice for the Duster,  Cordoba, Monaco, New Port and unexpectedly the Road Runner,  just to name a few. It was never sported anything bigger than a 2 barrel carb and the compression dropped to 8.5.

It didn’t get any prettier in the 80s either, although there a bit of a bump in the high-end of the hp range to 175 hp but the company more than made up for that dropping the lowest number 120.  Interestingly, they made the California models with 155 hp and a 4 barrel carb.  The compression stayed about the same, but  in ’83 – ’90 they made a HD version of the engine that had between 165 to 175 hp, depending on the year and sported a 4 barrel carb.  This configuration managed to lay down 240 – 250 ft lb of torque, not too bad in one of the lighter cars, like the Dart, but barely power enough for the big old St. Regis. The 318 was also added to some of the most memorable cars….come on..you doesn’t remember “vooo..la rau….oh..oh…” (Volare )and the LeBaron, and Aspen.  Even some larger cars like the St. Regis, New Yorker, Gran Fury (I can’t see any car begin called grand with only 120 hp, but that’s just me.) and the Imperial.

1976 Volare


Oh and speaking of the Imperial something interesting happened in 1982 and 1983.  That little something was EFI.  More on that in the next segment.

Thanks for reading.

Tim

’89 318 efi intake to ’79 carbed 318 – Mopar Forums

Hello, my brother and I are thinking of taking on a project and would like to know if the throttle body injection components from the 1989 318 in his truck will work on a 1979 318 engine. The reasoning behind this is due to our …

Wrenchin’ Tip Engine Swap 8/8/2010

At some point I’ve promised myself I would cover the restoration stories that center around my 1970 Mustang.  There is a lot to tell, trust me!! I’ve learned a lot!!!  

Engine - Before (250)


Engine After - (302)


But for this Wrenchin’ Tip, I’d thought I’d share a few hints that I did pick up.  Just to be fair I didn’t  do a lot of the engine swap work myself (Average Guy w/ average tool and average skills) but I learned a lot of general helpful hints and some Mustang specific helpful hints!!!  

So here are a couple of tips:  

 1.  Planning and scheduling a restoration is important.  If you are doing an engine swap or pulling it out for an overhaul make this the first step in your restoration.  Yes, I’ve seen the TV shows where they put the engine after the car is back from the body shop.  But hey this is the real world, and in this world, money is tight and body work is expensive enough not to what to afford to re-do it.  In this world, my average guy world, wrenches slip, grease stains and sometimes swinging 400 lb engine at the end of a chain can be…well…a bit dicey.  

2. Before preparing the engine for removal, you know, disconnecting all the electrical, fuel, A/C,  vacuum system, etc., take the hood off and store it someplace safe.  You’ll have a ton of room and you won’t bounce  that shiny, newly painted engine against it.  

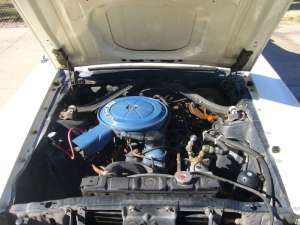
3.   Test fit the headers before you install the engine, especially if you aren’t putting stock headers back on.  You need to check the clearances around them and ensure you can get to key components , such as starters, after the engine is completely installed.  Nothing is more insane that having to pull an engine or headers just to replace your starter. Here is a pic of my Mustang’s engine with all the attachments.  

Clearance checking pre-fit!!!


More engine swap tips coming up.  

Thanks for reading.  

Tim

Auto Factoids for the weeks of 7/25/2010 and 8/1/2010

7/26/1945 Kaiser-Frazer Corp organized – it also include what was left of Graham-Paige car manufacturer. Frazer Nash was a British car making company.  In 1953 it became just Kaiser Motors. 

1946 Kaiser Nast Sedan


1953 Kaiser Darrin Convertible


7/29/1916 Nash Motor Company as founded by Charles Nash when he purchased a company called Jeffery Company which made a car called the Rambler.  I bet you can guess what came eventually  American Motors and their Rambler. 

Oh..in 1909 Buick purchased Cadillac on the 29th day.  

8/3/1900 The Firestone rubber company was founded by Harvey Firestone.  It was based in Akron, Ohio and had only 12 employees. Six years later Mr. Henry Ford contracted with Firestone to supply tires for the Model T. 

8/7/1937 the Cord company stopped production car, but of course when one to build planes etc. 

 Thanks for reading 

Tim

Auto Factoids for the Week of 7/23/2010

7/20/1984 E.L. Cord was in Missouri.  If you think he’s only responsible for the Cord 

1937 Cord


 Think again!!!!  How about a company that included Stinson Aircraft, Checker Cab and American Airways (now American Airlines)? But let’s just stay with the cars.  How about the Auburn and Duesenberg?  His history is a good read. 

7/23/1894 first auto race.  It was organized by the Parisian magazine “Le Petit Journal” between the Paris to Rouen.  And the winner was………… Count Jules-Albert de Dion it took  6 hours and 48 minutes at an average speed of 19 km/h (which was approximately 11.806052652509345 p/h). I don’t know what he drove but 2nd places was taken by George Lamaitre and he drove a Peugeot: 

Peugeot 3 hp

7/24/1929 – 2, 000,000 Model A Ford built – A huge milestone. 

1929 Model A

From a Reader – Household items to fix Cars.

Tim,

Here’s my story of using household items to fix cars.  Kinda like a turkey baster tool.  Ha Ha.

Finally solved the fuel boil over problem on the 82 Cougar wagon with an inline six and 1 bbl carb.

I live and drive mostly above 2,000 feet and with the fuel blending today the fuel in the carb bowl will boil over and come out the fuel vent in the carb throat, pooling in the intake manifold causing a flooded condition resulting in hard starting when the engine is hot with the huge plume of black smoke when it did start. I’ve tried all manner of fixes that included: lowering the float, retarding the timing, advancing the timing and investigating whether the manifold, catalytic converter or the exhaust was restricted in some way. I built a heat shield out of aluminum and tried that. Some people had suggested using a thicker carb base gasket or even doubling the gasket which would have required longer mounting studs for the carb. Since it hasn’t been a daily driver in the summer due to a broken a/c I’ve put off the fix. I tried to find a phenolic material to make a carb base spacer for the carb that would insulate it from the heat with no luck.

Finally my wife went to Wal-Mart and bought a plastic cutting board for me on my request. It’s made from a hard polyethylene material that’s just over 7/16″ thick. So, I did the obvious scientific test on the material. I got the car to operating temperature and held the cutting board to the exhaust manifold and it did not melt. So I cut the board, drilled the carb bore hole with a 1 and 7/8″ hole saw, drilled the stud holes, made a thin gasket for both sides of the material and sealed it with red high temp permatex gasket maker and installed my new base plate. To test I drove the car in 108 degree heat to full operating temperature for 10 miles with the now fixed a/c blowing hard and the boil over problem is gone. There is no longer any fuel smell or hard starting when hot due to fuel in the intake manifold. Finally after almost 8 years this annoying problem is fixed. I don’t know why this material insulates so well over the factory thick gasket but it does.
The material doesn’t seem to be affected by fuel either.

I’m sure others have been baffled by this problem since most fuels today contain ethanol and other materials that lower the boiling temperature of gasoline.  Altitude certainly plays a part as my car never did this at sea level even in 100 degree weather.

Steve Sears
Ridgecrest, Ca.

Wrenchin’ Tip 7/18/2010 – Fluid Removal

I recently did some work on my power steering system found this tool to be handy. 

 There is a lot of fluid in the power steering reservoir.  As soon as you release the hoses, it’s going to poor all over the front of your engine and then on the ground.  An oil change tub will help keep it off the garage floor, no staining and no tracking it around. However, it will still run down the  engine.  

So, I used a turkey baster.  EEEERRRKKK…(yeah it’s in caps!!!)  Do not put it back in the kitchen when you’re done….NO…NO..NO….In fact if you are smart, ask first!!!  I did and I was surprised to hear  “Sure, but you’ll have to purchase a replacement.” For a minute I thought….well that’ll come out of my car budget….and I thought…I wonder if I can clean it up…and…ummm…(kidding of course).  It worked great and I just have to purchase one…but not until Thanksgiving!!!!  $10 bucks says..I’ll forget and have to run out on Thanksgiving and stand in line for 1.25 hours, if I can find one at all.  

 BTW – I recommend “Pampered Chef” brand for power steering fluid removal!!!! 

Pampered Chef Turkey Baster

84 Corvette – Power Steering Work

Two guesses as to my next project on my C4……cricket…cricket…cricket…Give up?   Fine, its replacing the power steering reservoir and connected hoses.

Just for fun?  Nope, who’d want that mess of a job, just for fun?  No…no it is not an upgrade but a serious leak. 

Hey kids its story time!!!!  Let me tell you about the big shiny Vette that ate all of the average guy’s car budget.  Grab you binkies…it’s horrifing.  

If you’ve been reading my posts, you may recall (“come..you ‘member!!!” {I stole that from the comedian George something}…..What you don’t hang on every word I type?…You don’t re-read my post to memorize all my car woes and tips and humor???..that’s what I figure…yet I keep on typing….its good therapy for me!!!) that my vette over heated, not once, but twice!!!   Freak catastrophic radiator hose split and then the fan frying it’s self.   

After I got it back from the shop, where I had them check the electric work I did when installing the new fan, I noticed a leak under the car in the driveway.  I hate leaks under my cars, almost as much as the Ms. hates the side affects they have on our driveway (I’m not crazy about them either).  The leak was not too big and when I cleaned it up, I chalked it up to left over coolant from the over heading, it had the right consistency. Then I washed the car.  Nice shiny beautiful red…money swilling Corvette!!!! 

Drove the car to work and home again and came back out a bit later to put the garbage cans on the curb….errrkkk…hey…Tim..no one, not one single person, cares why you came back outside, and just as many care where you put the trash cans… and I’m going out on a limb here…but I’m betting the total is the same for whether you drove it to work…to the store…or Japan…got it bro???!!!  These are valuable minutes of our lives being spent here reading this!!   Ok..I got it. The pool was bigger than before and it no longer could be mistaken for coolant.  It was without a doubt, transmission fluid, or power steering fluid.  Whether it is GM or Ford, either of their recommend power steering fluid looks and feels similar to the transmission fluid. 

Dreading the worse news, I decided to first check what I hoped was the problem, power steering fluid, I’d hate that less then tranmission issues.  Luckily…(isn’t that the way it is with older cars..your happiness is measured by the size of what’s broken, or needs replacing)…it appeared that it was just the top of the hoses on the reservoir, near the hose clamps…perfectly understandable….it’s an old car..and simple to replace (remember that later on in this post). 

Here are the hoses: 

Hoses leaking near the clamps.


I’m thinking…oh..”SLAM DUNK” easy fix.  Perhaps, but come on….really….does it really ever turnout that easy…yes it does…but not this time!!! 

After further inspection, I noticed something else..oh…you’ll love it!!  I’d tell you but you know a pic is worth 250 cuss words (most of those aren’t real words but I do have some unique arrangements of the classic 4 letter ones and a few bigger).  Ready???  NO!! For the pic… make up your own cuss phrases!!! 

Sigh!!!


Well that does make it a clean sweep…everything above the pump up needs to be replaced!!!  Ok, still not horrible, so I’m much happier knowing it’s not the transmission!!!!  Just order the parts and we are home free. 

And that’s the end of the story…expect for the part where the hoses aren’t available any more and OMG, you betcha, they aren’t straight hoses.  Here…take a look!!! 

From the reservoir, down to the pulleys, nothing but bends!!!


Better look at the hose going straight down the Front of the engine block


They are molded to hold shape, there is no room for anything but the exact bends or they will rub against the pulleys and last..oh..maybe a week!!  

And finally… 

And a little wider view.


The reservoir and one hose that is supposed to fit are on their way…be here tomorrow. The other hose is not available…no not out of stock and on back order…not made any longer.  

But I have an idea….I’ll give that to you tomorrow. 

Thanks for reading 

Tim

Auto Factoids for the week of 7/11/2010

We got a first and a last on the same day – 60 years apart.

7/12/1922 – Frist Checker automobile  built

1922 Checker Cab


7/12/1982 – Last Checker automobile built

1982 Checker Cab


7/14/1955 – First Karman Ghia – I really like these cars.  I might own one some day, but maybe a Covair instead!!!

1955 Karmann Ghia - didn't change much from '55 - '74

7/16/1935…first parking meter in place in Oklahoma City, 30 minute later was the first parking ticket.

First Parking Meter

Thanks for reading

Tim

Auto Factoids for the Week of 7/4/2010

Here ya go, enjoy. 

7/6/1946…..U.S. began producing car again after World War II.  It is a bit misleading but some cars companies did continue to produce cars.  At the very onset of the war (1942 thereabout), some of the first effort were to build the cars without all the chrome, painting the trim instead, the first “blacked out” (they were actually called “blackout specials or models” ) which became popular with the grilles in muscle cars later on.  Washington dictated that stainless-steel and chrome would not be allowed on cars except on of bumpers, bumper guards, and windshield wipers. 

1942 Chevy Front.


1942 Chevy Backside


I think it looks great!!! 

7/8/1909  The first Hudson was built. 

Hudson Roadster from 1909


Thanks for reading 

Tim

1970 Mustang – Replacing my Pillar Post Moldings Part III

Caulk another tasks down on the restoration of the Mustang. 

I finished up the pillar post molding last night.  Here is the before: 

Pretty?


Now these were not as labor intensive as the dash-pad but here were some issues. 

We’ll walk through them. 

The removing the dash-pad was chronicled in my earlier post and that was pretty quick now that I’ve done it twice. 

Once the dash-pad was removed there is an additional piece that needs to be removed, or at least a couple of screw removed on each side. That is the top molding: 

Top Molding


 In the picture above I’m pointing to one of the screws in the top molding that runs the length of the windshield.  That screw  is actually through the pillar molding which is partially behind it.  The top molding has 5 screws, two on each end and on my coupe the fifth is in the center and holds the plastic snap for the ends of the sun visors.  That screw does not have to be removed there is plenty of play after the removal of the four other screws, to safely (without forcing anything) remove and install the new moldings. 

The next step is removing the two additional screws that hold the pillar molding to the pillar. 

Screw Marked Remove


and this one: 

Second screw to remove.


It’s tough see there but here is a good clear picture…that old mold was so deteriorated it actually fell apart. 

Lower molding screw.


When I said it fell apart……. 

Yup. It was in bad shape.


The other side came/fell off the same way, in pieces, nothing left to do but snap the other pieces on and…eeerrrrkkkk(insert braking sound)…”Yeah..anybody know if you can insert sound in there a WordPress blog??” ….cricket..cricket…cricket……huuummm where’s my…oh I have no staff…well, only when my son visits (he does some on my graphic design..more on my new logo search later..maybe you all can vote on one??) back to my eeerrkkk…we need to discuss quality of workmanship for reproduction parts.  That won’t be a long discussion..”sucks”…there ya go, end of discussion. 

But really I know that they try, and I am grateful for something that looks almost as good, especially for a rare car like mine (…meaning not very sought after..at least not yet…therefore the profit in making any unique parts is next to nothing.) 

One of the first things about this particular molding is that is about 1/2 the thickness of the original and made of light plastic.  This worked out because the holes are not exactly lined up and there was a larger problem. 

Offset isn't correct.


As you can see the molding on the right (the original) where the screw driver blade is located, is recessed about 1/2 an inch, if not a little more.  On the left (new molding) there is almost only about 1/4 of an inch..maybe a bit less.  If the material for the new molding was as rigid as the original there would be no flex in the material and the lack of offset for tab on the new molding would not have allowed the use of the original screw, it would have been too short. Additionally, screw holes A and B  in the picture below were not aligned properly and would not have enough ”give” but allow installation, if it was stiff as the original. 

Improperly aligned.


 Was this engineering genius or happy mistake? 

Generally, the fit was close, not contours car show inspect-able close, but close enough for the local guys.  But if you can find parts made from “original tooling” (we talked about that when I was install the dash-pad for the first time) buy those, if your Average Budget can handle it.  These molding just aren’t available in any other tooling. 

With the holes in the wrong place it took some pressure and jostling to get them into place.  One tip I can pass on is do not tighten the screws until you have them all started.   I had to leave the top two screws out far enough to allow movement to get the bottom screw in. 

Keep the screw loose to maneuver the piece around.


 In the end the result were pretty good. You be the judge. 

Left side


Left side bottom (and my vette in the background)


Right side (and my neighbor's truck...like you need to know that!!)


Left Side bottom


Over all it took about 3 hours with interruptions with phone calls and neighbors stopping to chat.  It’s like Soaring over on www.MustangV8.com forum said..”Those are the kinds of tinkering jobs I like.  You get satisfaction you can actually see.”  (BTW – I like that forum, the Classic Mustang section is great.) 

Thanks for reading. 

Tim